How to drive a TFT display (Arduino)


It is quite easy to drive a SPI 128*160 TFT display with a ITDB18SP controller when you use the UTFT library of Rinky-Dink.

http://www.rinkydinkelectronics.com/index.php


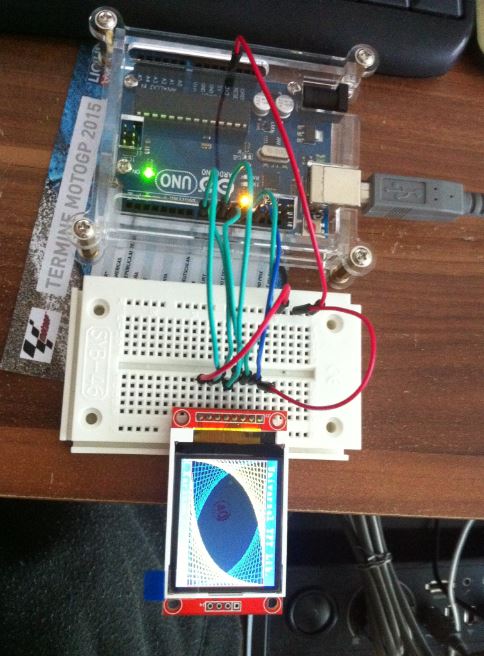
Just wire everyhting as the picture shows above, flash the code and have fun with the demo pics.


Here you can see the example code of Rinky-Dink where you only have to change the controller and the pinout.


Main Program

View source
// UTFT_Bitmap_128x128 (C)2012 Henning Karlsen
// web: http://www.henningkarlsen.com/electronics
//
// This program is a demo of the drawBitmap()-function.
//
// This demo was made to work on the 128x128 modules.
// Any other size displays may cause strange behaviour.
//
// This program requires the UTFT library.
//
 
#include <UTFT.h>
#include <avr/pgmspace.h>
 
#define SDA 9 
#define SCL 8
#define CS  12
#define RST 11
#define RS  10
 
UTFT myGLCD(ITDB18SP,SDA,SCL,CS,RST,RS);   // Remember to change the model parameter to suit your display module!
 
extern unsigned int icon1[0x400];
extern unsigned int icon2[0x400];
extern unsigned int tux[0x1000];
 
void setup()
{
  myGLCD.InitLCD(PORTRAIT);
}
 
void loop()
{
// Draw a 4 by 4 grid of a 32x32 icon.
  myGLCD.fillScr(255, 255, 255);
  for (int x=0; x<4; x++)
    for (int y=0; y<4; y++)
      myGLCD.drawBitmap (x*32, y*32, 32, 32, icon1);
 
  delay(5000);
 
// Draw a 64x64 icon in double size.
  myGLCD.fillScr(255, 255, 255);
  myGLCD.drawBitmap (0, 0, 64, 64, tux, 2);
 
  delay(5000);
 
// Draw a 2 by 2 grid of a 32x32 icon in double size.
  myGLCD.fillScr(255, 255, 255);
  for (int x=0; x<2; x++)
    for (int y=0; y<2; y++)
      myGLCD.drawBitmap (x*64, y*64, 32, 32, icon2, 2);
 
  delay(5000);
}


If you want to display some photos, you will find in the download of the UTFT Library a tool where you can convert photos into .c files.

Just put the files into the directory of the .ino file and place a code line with referencing to the .c file.

Now you are able to see a funny pic on your TFT display.